How to Start a WordPress Blog with Bluehost: The Ultimate Step-by-Step Guide
Hello, future blogger!! 🎉
Did you know there are several people who own highly successful blogs who work from home, choose their own hours, and make a full-time living? I wanted that kind of online business – a real digital asset. And I want to help you guys do the same!
Follow these easy steps to create a WordPress blog with Bluehost in this comprehensive beginner-friendly guide. With these steps, you’ll have created a blog in less than an afternoon.
So grab some coffee and put on some jazz – HERE WE GO!
STEP 1. PICK A BLOG NAME AND NICHE
First, let’s decide on the name and niche of your new blog. This is usually the part where people get stuck, but we’re going to keep this simple and easy.
The name of your blog is the first thing your audience will remember (e.g., TheMoneyCherry 🍒). The name will also be the domain name of your blog (URL). So it should ideally capture the broad themes you’ll be discussing. It could just be your name (yourname.com) or a play on words (yourawesomeblogname.com).
But just remember, to keep it: easy to spell, easy to remember, and easy to spell.
Your blog niche, or blog idea, is the general topic your blog focuses on. Examples of blog topics are travel, food, personal finance, fashion, and technology. If you utilize a word or two about your topic in your domain name – your readers will find it very helpful.
STEP 2. SET UP YOUR BLOG – THE TECHNICAL STUFF
The second official step is all the tech stuff – setting up and getting your blog online. This means we’re getting your domain name and hosting provider.
TheMoneyCherry🍒 uses Bluehost which is what we will use for this guide. They’ve been affordable and anytime I had a problem, they’ve been stellar and prompt with help.
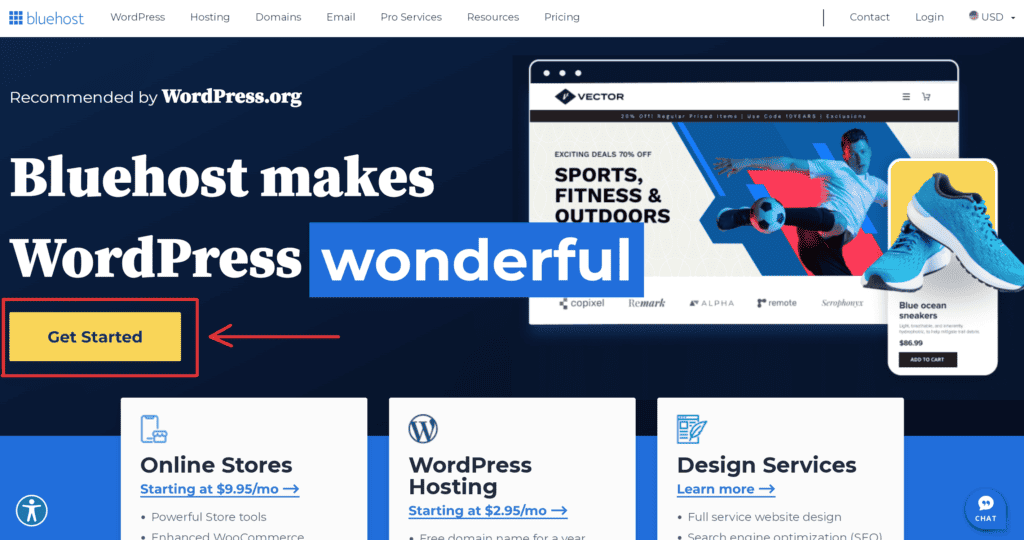
-> Click here to head over to Bluehost and hit the “Get Started Now” Button.
Next, choose your hosting plan.
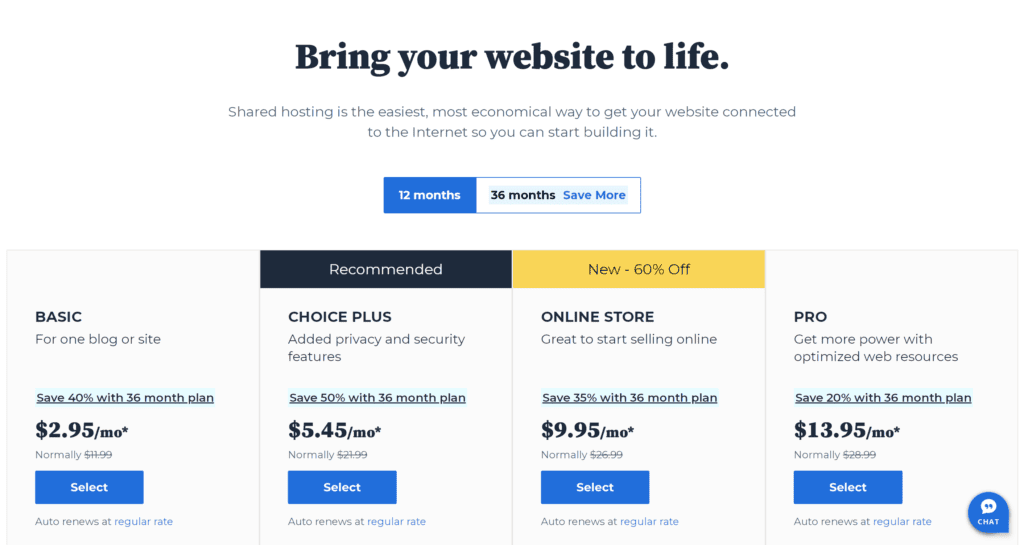
You’ll see that prices range from $2.95 to upwards of $13.95 per month. While there is nothing wrong with the BASIC plan for starters, I highly recommend the CHOICE PLUS for the Domain Privacy feature. This will protect all your information and privacy going forward.
But not to worry – all these plans will do. With the BASIC plan, you can add Domain Privacy at checkout later.
Once you’ve selected your plan, take out the name you’ve decided on in Step 1. It’s time to register your domain name. (Eg. themoneycherry.com)
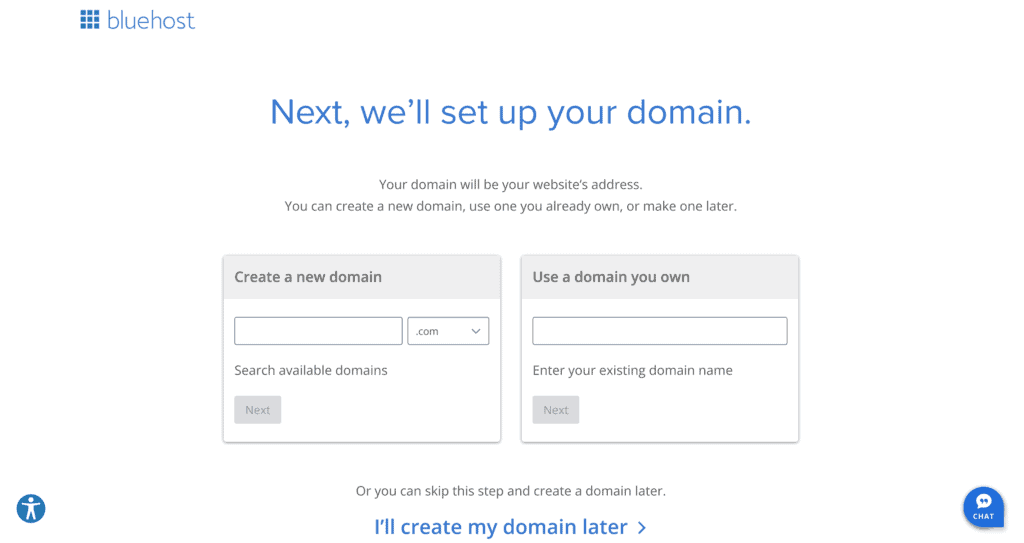
If you already have a domain name purchased elsewhere (eg. Namecheap), use the box on the right. If you have not decided on a domain name, or the one you wanted is not available, go to the bottom and click ‘I’ll create my domain later‘.
Click Next.
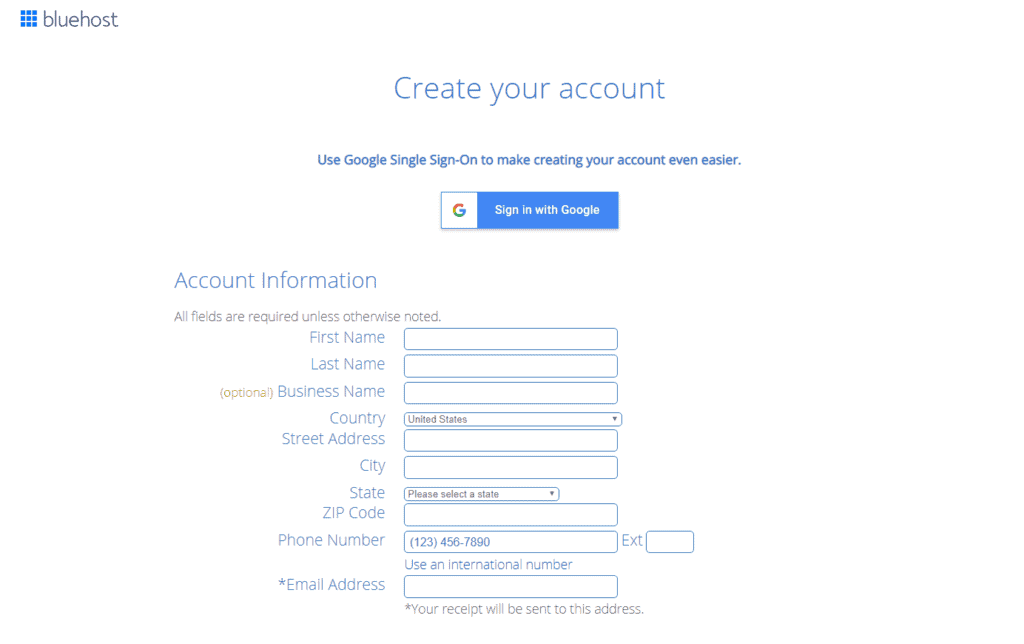
Finally, create your Bluehost account. Remember to use your latest email when you’re filling out your information. This is the email that Bluehost will send all your billing info and account information – so double-check!
Select your package and package extras. Enter your payment information. Click Submit. After your payment went through, you’ll see “Congratulations, you successfully created your account.” Woohoo!
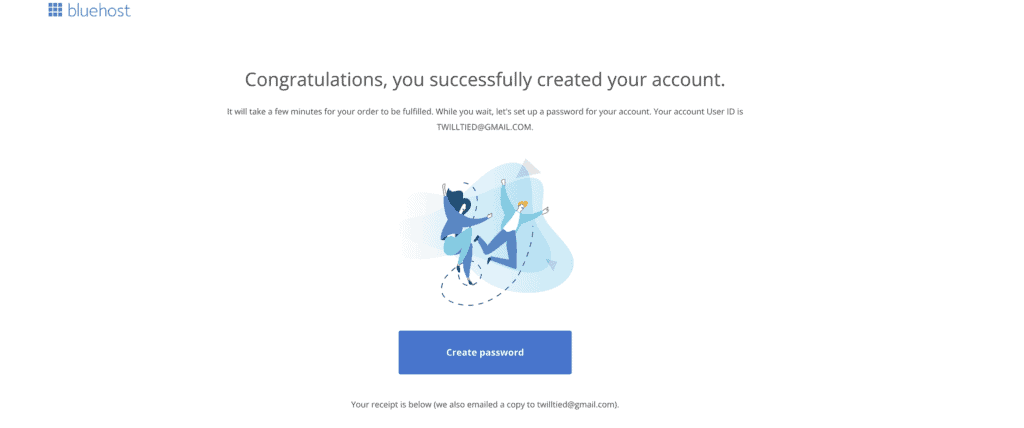
Create your password to complete your Bluehost setup. Login to your Bluehose account.
User ID = your new domain name
Password = the one we just created
We can log into our Bluehost account in future, by going to bluehost.com/login and entering these details.
And Voila! You should see a “Welcome to Bluehost” and that means you’re one step closer to being a blogger!
STEP 3. INSTALL WORDPRESS – THE BLOGGING GIANT
Now, this is the fun part!
We’re going to install WordPress, a free blogging platform and the best one to use. Bluehost makes this step super easy. But first, a quick run-down of some basic terminology so you fully understand the backbone of your blog.
WordPress.com vs WordPress.org
WordPress actually comes in TWO platforms. Both operate on the same CMS but they are quite different.
WordPress.com
– limited monetization options (cannot sell your own ads)
– limited support
– limited customization and designs
– limited SEO and analytics
– can purchase hosting and domain for a fee
– FREE but domains look like this: yourname.wordpress.com
WordPress.org
– full customization potential
– total control over monetization efforts (your own ads permitted and other ad networks granted)
– SEO features (people can find you easier!)
– full access to plugins
– more ownership / self-hosted
– FREE
The main difference is that WordPress.org requires you to get your own hosting. For the opportunity to grow as a blogger, what you want is WordPress.org. There’s no comparison.
After you have created your password, Bluehost will automatically bring us through the WordPress installation process.
If you’re adding a domain from another company like NameCheap, click on ‘Hosting’ on the right. You will need that domain to point to this new account before installing WordPress. Then, we need to enter the domain name we want to use.
Click Continue. Bluehost will start installing WordPress right away.
Once the WordPress installation is complete, it’s time to Log In.
Note: your new domain name might take a few hours to set up. You might get a message saying “This site is using a temporary URL until http://yourdomain.com is pointed at Bluehost. If this is a new domain name, it might take a few hours to finish setting up.” This is okay! Proceed to Log Into WordPress.
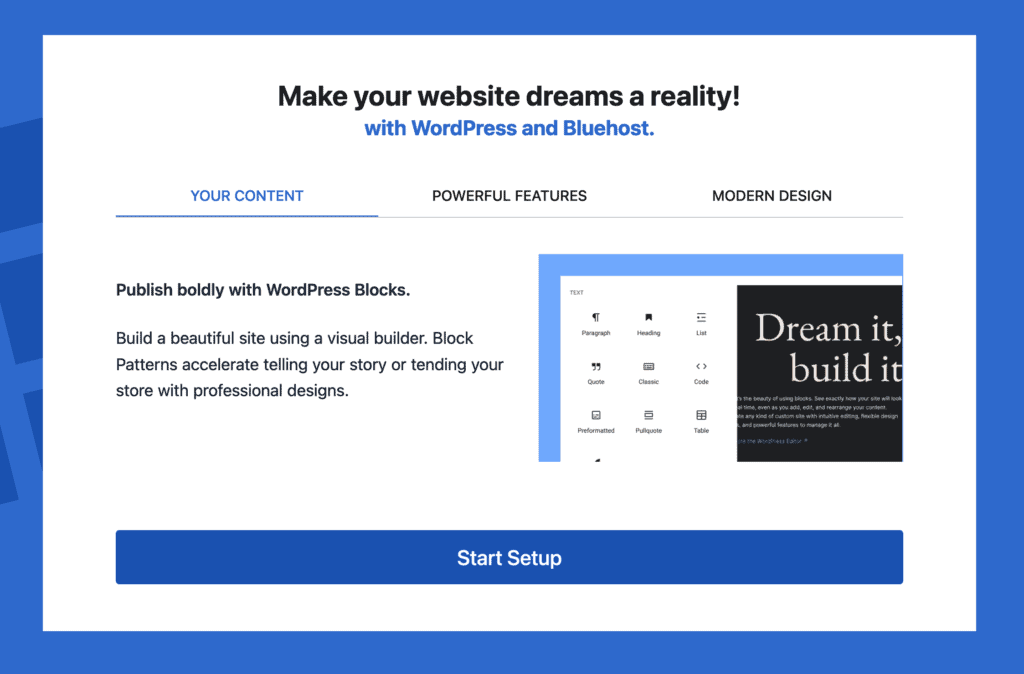
You’ll then come to a page that looks like the one above with the message “Make your Dreams a Reality.” This is the WordPress onboarding process. I recommend skipping this so that you can use WordPress themes instead – it’s easier to change and customize later.
Click Exit to WordPress on the top left. (Then click Exit.) This will take us to the WordPress Dashboard.
This and your Bluehost dashboard are like your control centre. Spend some time familiarizing yourself with the Dashboards and where everything is – especially the admin area. You’ll be able to develop a much deeper understanding of how WordPress works. The largest part of the learning curve is just finding out where everything is.
Choose Your WordPress Theme
WordPress comes with a ton of free blogging themes to choose from, so start with one of the options you like in Appearance > Themes > Add New Theme > Popular. You can always come back and change it later.
You also don’t have to commit to a paid theme right away. Just because it’s paid doesn’t necessarily mean it’s better. When you garner enough traffic and start making money from your blog, you can justify the investment.
I personally use Kadence for it’s speed, which is the theme TheMoneyCherry currently operates on. There are free themes and paid themes, and you can always switch based on how your blog grows and develops.
Remember, we’re not looking for something pretty that suits your blog, be sure to use the following when deciding on your blog theme:
- Simple to use: Don’t spend more time learning to navigate the interface any more than you have to. It must be easy to read and navigate for you and your readers.
- SEO (Search Engine Optimized) friendly: Being SEO-friendly refers to how well Google and other search engines can find your information when people search for it.
- Responsive. This means your blog can be shown (and look good) on a computer, smartphone, or tablet with no problem. Over 70% of all internet users visit via a smartphone or tablet nowadays so we can’t dismiss 70% of potential readers because your blog is not responsive. If you’re not sure if your theme is mobile-friendly, copy and paste the URL of the theme’s demo page into Google’s Mobile-Friendly Test page.
- Support Plugins. Plugins make WordPress magic happen. It’s like adding an app to your smartphone to give it a new function. Imagine wanting to add a special feature to your blog, like a photo gallery, a contact form, or even an online store. Instead of hiring a developer or learning complex coding, you simply add a plugin that does the job for you.
Why your blog Design is so Important
Good blog design is paramount for several reasons.
Firstly, according to a study by Google, users form design-related judgments about a website’s aesthetics within 50 milliseconds of viewing. This rapid judgment is a manifestation of the “Halo Effect,” where if a blog looks professional and appealing, visitors are more likely to perceive its content as valuable and trustworthy. Simply put: Good design builds trust.
Once you’ve settled on a WordPress theme you like – one that is simple and easy to read – we now bring the “add-ons” that are plugins.
What is a Plugin and which ones are a must?
WordPress Plugins are awesome! While they are considered an “add-on”, plugins are essential to running your blog efficiently. Plugins add all sorts of features like email opt-ins, malware protection, privacy protection, helping your SEO, tracking your analytics, optimizing images, and increasing your loading speed.
There a hundreds of plugins to choose from. To help narrow down the decent ones to start, here’s my list:
1. RankMathSEO (SEO): This plugin helps you optimize your blog posts, titles, meta tags, meta descriptions, and other elements that help your blog be found. Why is that important? Because the more people find your blog, the better your blog will do.
2. Wordfence (Security): Wordfence is a security plugin for WordPress websites, offering protection against malicious attacks and malware. It features a firewall, real-time threat monitoring, and a malware scanner. By providing login security and incident recovery tools, Wordfence ensures that WordPress sites remain safe from online threats. In short, it’s a digital shield for your website.
3. SiteKit (by Google) (Analytics): Site Kit by Google is a WordPress plugin that integrates multiple Google tools directly into your WordPress dashboard. It provides insights from services like Google Analytics, Search Console, AdSense, and PageSpeed Insights, all in one place. It offers a consolidated view of how your content is performing, where your visitors are coming from, and how to optimize for better revenue and user experience. Essentially, it streamlines the process of gathering and analyzing data, helping you make informed decisions to grow your blog effectively.
4. Updraft Plus (Website Backups): UpdraftPlus is like a safety net for your WordPress blog. This plugin lets you back up all your blog assets —posts, themes, plugins, and more. Updraft Plus stores them safely in places like Dropbox or Google Drive so when something happens (Gawd forbid) you can quickly get your blog back on its feet.
5. ShortPixel (Image Optimization): ShortPixel is your blog’s secret weapon for speedy loading! It’s a plugin that compresses and optimizes your images, making them load faster without losing quality. Your readers get a smoother experience, and you save on storage and bandwidth.
6. WP Rocket (Speed): WP Rocket is designed to enhance your website’s speed by optimizing and caching its content. By doing so, it ensures that your pages load swiftly, reducing the wait time for your readers. A faster site not only improves user experience but can also boost your rankings in search engine results. So, with WP Rocket, you’re not just offering a smoother browsing journey for your visitors, but you’re also giving your blog a better shot at being noticed. It’s a win-win for both you and your readers.
Install Plugins Fast
The easiest way to install a plugin on WordPress is by doing it from within the WordPress dashboard.
To do this, we just need to click Plugins, in our left dashboard menu. Search New. Find the plugin you wish to download. Click Install Now.
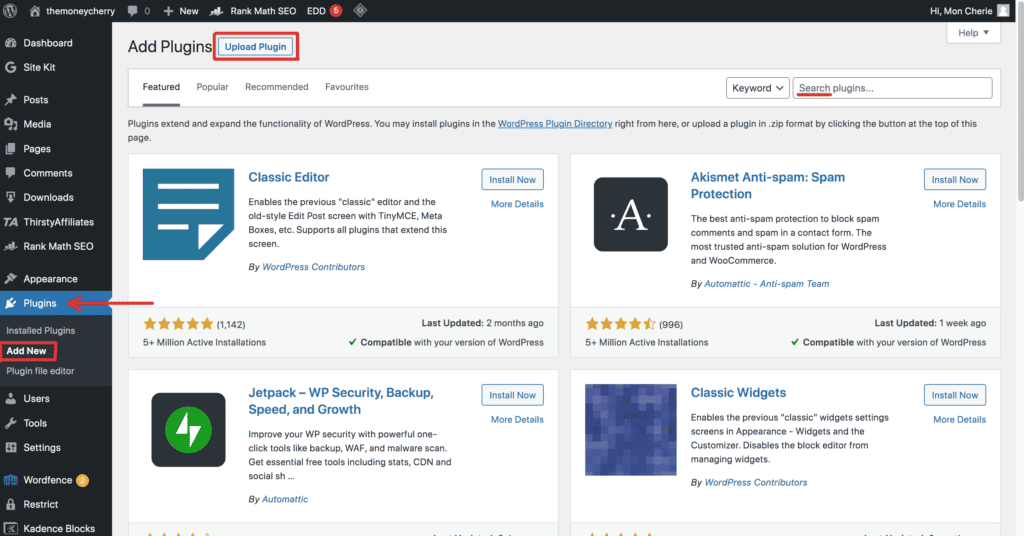
Now that we have the settings on your new WordPress blog set and ready, we move on to your important content – your Pages.
STEP 4. SET UP IMPORTANT PAGES
Now that you have set up your blog’s look, we need to start to set up the most important pages. Pages are static websites pages that don’t normally move. In this case, these three are your ‘core pages’, that showcase to readers what you’re all about and why people should listen to you.
Creating a new page is simple. Look to the left menu. Select Pages > Add New, and you will find yourself on a page that looks like this:
Create a Page

These pages are pivotal to establishing your trust, transparency, and accessibility for your readers and potential collaborators. It’s not an understatement to say this is how readers get to know who you are.
How to Write an Awesome About/Start Here Page
While this is a great chance to introduce yourself and your story, it should just as much be about the readers as it is about you.
The About page provides context about the blog’s purpose, the journey that led them to start the blog, AND what value it will provide the readers.
Things to consider on your About page:
1. Who is this blog for? (eg. “easy and quick recipes for the working mom”)
2. Why should they listen to you? (eg. “I’ll share everything I learned from building a business so you can too.”)
3. What should they do next? (eg. “Sign up for my newsletter so you can be up to date with tips.”)
How to Write a Contact Us page so people can reach you
Whether a reader has a question, feedback, or a business opportunity, the “Contact Us” page provides a direct line of communication.
It’s essential for building relationships and addressing concerns, even when you’re ‘just a newbie.’ It could be as simple as just a social media handle or email.
One of the best and easiest ways for people to contact you is to use a form plugin like WP Forms. It lets you create custom contact forms just by dragging and dropping elements.
how to write your legal pages
While it might seem formal, these pages are crucial for legal reasons. A lot of bloggers will start having these pages after they’ve garnered some traffic. I, personally, would not take the risk and establish these legal pages as soon as your blog goes live. The three important legal pages that every website needs are: Privacy Policy, Disclaimer, and Terms and Conditions.
A Privacy Policy is a legally required statement that discloses all of the ways you gather, use, disclose, and manage a reader’s data. It fulfils a legal requirement to protect a reader’s privacy. If you collect personal information from your website visitors, you need to have a Privacy Policy posted on your site.
It outlines the rules and guidelines for using the website and provides disclaimers to protect the blogger from potential liabilities. It ensures that readers understand their rights and responsibilities while interacting with the blog’s content.
Check this page for info on what privacy policies are: Sample Privacy Policy
You can also generate a privacy policy here: Privacy Policy Generator
A Disclaimer on a blog explains that others should not rely on the information on your blog and that you cannot be held legally responsible for anything you publish on it. For instance, a health and wellness blog might have a disclaimer stating that the advice provided is for informational purposes only and not a substitute for professional medical advice. You will need to tailor your disclaimer to your specific niche and blog.
By having a disclaimer, you “disclaim” or “deny” liability for the content you publish on your blog.
Check this page for more info about disclaimers: How to Write a Blog Disclaimer
A Terms & Conditions page on a blog outlines the rules and guidelines that users must agree to in order to use the website. Simply put, it helps your readers to understand what they should expect from your blog.
By clearly stating what is and isn’t acceptable on the blog, it ensures a structured and respectful environment for both the blogger and the readers. It covers aspects like copyright restrictions, comment policies, community guidelines, and data-handling procedures
Even if you do not make money on your blog, I strongly recommend having one. Let your readers know your work is protected by copyrights, about how you monetize your blog, and disclosures about your affiliates.
Check out this post for more info about Terms & Conditions: Sample Terms & Conditions Templates
In essence, these pages are foundational to a blog’s credibility and professionalism, ensuring that readers have a clear understanding of the blog’s purpose, the means to communicate, and the rules of engagement.
STEP 5. WRITE YOUR FIRST BLOG POST
Pat yourself on the back for making it this far! (Want to refill that coffee first?) Stick with me for a little bit longer, we are very nearly there to complete your blog setup! Now, it’s time to write.
Consider for a minute why you continue to come back to your favourite blogs. It’s not because they have regular updates, but you care about what it says. The content you read is something you enjoy, find useful, or both!
That’s all there is to it! To create quality content that people want to share is to write useful and in-depth content that people want to read. And the more value you give, the more people return to your blog, and that’s how your blog makes money.
We talked about Niches in Step 1. People won’t come back if your content is all over the place. Once you have a main topic, it’s easier to build your brand and narrow down the topics you wish to write.
who is your blog audience?
Do you really want to know what your target audience wants to read about? And what are their problems that need solving? We can actually break it down simpler than guesswork.
Keywords and Research.
A keyword is a specific term or phrase that describes the content of a webpage. Often keywords are used to help search engines match a page to a search query in what a reader is looking for. Essentially, it’s what users type into search engines to find relevant information or content online.
For bloggers starting out, check out Ubersuggest. It’s not as robust as services like Arefs, but for bloggers starting out, it is perfect. What you ought to keep an eye out for right now is search volume which shows the number of people searching for a certain keyword (so you know this is popular and what people are looking for). This helps identify opportunities that could bring in more readers in the short term.
The goal is to figure out what your readers want so they keep coming back. Building a genuine relationship by doing the research into what your audience wants and connecting with them.
Pick an Engaging headline
Thousands, if not millions, of posts are published each day. Search engines like Google crawl and index yours amongst all those competitors. What they take note of are properly worded and engaging headlines that encourage readers to click and share.
Create a good head with some (and in combination with some) of the following tips:
- Ask the readers a question in the headline
- Use your target keyword in your title (eg. if you’re writing about ‘best fishing hooks’, use the keywords ‘fishing hooks’ in the title.)
- Start with a number in your headings. (According to this article, headlines that start with an odd number get more clicks e.g. “7 Fast 10-minute recipes” and “9 Reasons to Use xyz.” ) This is especially useful for articles with compelling lists.
- Add parenthesis to make it more interesting
- Use a combination of compelling, emotionally charged, and positive/negative, words
create your outline
Building upon what we know about headlines, structure your post so that it’s compelling, informative, and easy to read.
Check this page for info on what compelling blog posts with good SEO: SEO Copywriting: The Compelling
prioritize quality over quantity
Quality of information and the authenticity of your voice will benefit your blog in the long run. More so than simply shelling out blog posts for the sake of quantity. People do not read unless it benefits them. One really good blog post will always be better than ten “fluff” posts.
STEP 6. PROMOTE YOUR BLOG
Thousands of blogs get created and thousands of posts get published on a daily. Without marketing, no one will be able to find your blog out of the sea of thousands. If there’s no traffic, it’s incredibly hard to monetize and establish yourself as an authority.
Aside from optimizing your blog, here are some strategies to help market and promote your blog:
Remember the simple formula: Traffic = Money & Authority.
You are ready, young padawan!
You did it! You made it all the way to the bottom! Let’s quickly recap:
In the future, as your blog grows, you’ll find that you’ll need help in other areas. I used to think I had to do everything on my own but it’s actually detrimental if you don’t ask for help. If you try to do everything and wait too long, your blog will suffer. It frees up time to focus on the more important parts of your business, and it benefits from learning from people who you need help from.
Blogging isn’t hard. But it’s not a walk in the park either. But it’s worth it.
Becoming a successful blogger is just about time and consistent effort. You’re about to embark on an incredibly rewarding journey. It certainly is for me!
If you found this page of value to you, or know anyone who would benefit from here, I would be incredibly grateful if you’d like to share this guide with them. And if you need any help, feel free to send me an email! I would be happy to help you. =)
Thanks so much for taking the time to read!
More Blogging Resources:


Leave a Reply